User Manual for V1.4
[smartpacker.net] -> [Download] [Manual] [Forum] [How to Buy]
1
Overview
1.1 Function and Limitation
1.2 Licensing
2
Installation and
Uninstallation
2.1 Installation
2.2 Uninstallation
3.1 Initialization and
Input
Parameters
3.3 Understand the
Blueprints
3.3.1 The
Orientations of
Carton
3.3.2 Expression
of the
Whole
Arrangement
3.3.3 Finalization
of the
Actual
Plan
1.1 Function and Limitation
SmartPacker is a computation tool for cargo container shipping business. Given the dimensions of the container and the carton (length, width and height), the software explore a large number of packing patterns to get the maximum carton number. The solution is then presented with a set of detailed illustrations, make it easy to understand and implement.
For packing problem with several batches of cartons, while cartons of each batch are of different dimensions, SmartPacker V1.4 introduced a new function which compute the minimum container length needed to pack each batch (see 3.6). Anyway, more advanced algorithm for cartons of various dimensions is still in development.
The interface of SmartPacker is in English as well as Chinese language, it can run on Windows platform.
The software is sold as is, without any warranties whether expressed or implied.
For the complex nature of the three dimensional packing problem, SmartPacker could explore only a subset of the whole feasible solution region. Therefore, although SmartPacker can find out an arrangement with quite a maximized carton number, it is still possible that arrangements with even bigger carton number exist.
And for real cartons are not ideal rectangular solids as presumed in the algorithm (cartons may be distorted by pressure or humidity), arrangements provided by SmartPacker may be infeasible in some cases. Accordingly, when setting a transportation plan, users are advised to check the feasiblity of an arrangement in practice, and may need to revise the dimensions of the carton or the container to get a otherwise feasible arrangement (see 3.5 for more information).
The SmartPacker software product, as well as the algorithm used to solve the 3D packing problem, is developed by Wu Xiaoyong independently, all rights reserved. The VB runtime supporting files included in the setup package are redistributed according to the terms of the Microsoft Visual Basic 4.0 license agreement.
SmartPacker V1.4F is a demo version free of charge. It can be redistributed, installed and used for evaluation purpose.
SmartPacker V1.4 (formal version) can only be copied, installed and used after registration. (see how to buy for detail)
For any version of SmartPacker, one should not modify, reverse engineer, decompile, deassemble or otherwise attempt to discover the source code of this software product.
2 Installation and Uninstallation
To install SmartPacker, run the setup.exe in the setup package, then follow the instructions on the screen.
Notices:
(1) Close any currently running application when you are to install a new one.
(2) The default folder where SmartPacker will be installed is "C:\Program Files\SmartPacker\", but you can choose another folder during the installation.
(3) If SmartPacker is already installed on your computer, when you need to install a new one (such as an upgraded or formal version), uninstall the old one first. (see 2.2)
(4) Installing SmartPacker on Windows NT may be unsuccessful due to the operation limitation of the NT account used.
(5) When installation is completed, SmartPacker icon can be found at "Start->Program" menu.
To uninstall SmartPacker:
(1) Open "My computer" on the desktop, then enter "Control Panel".
(2) Open "Add/Remove Programs" utility, find "SmartPacker" item and remove it.
3.1 initialization and input parameters
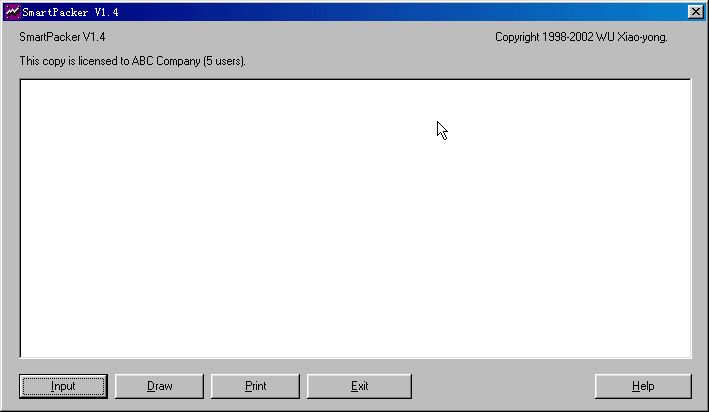
After initializing, SmartPacker show its main frame
Fig.1 The main interface of SmartPacker
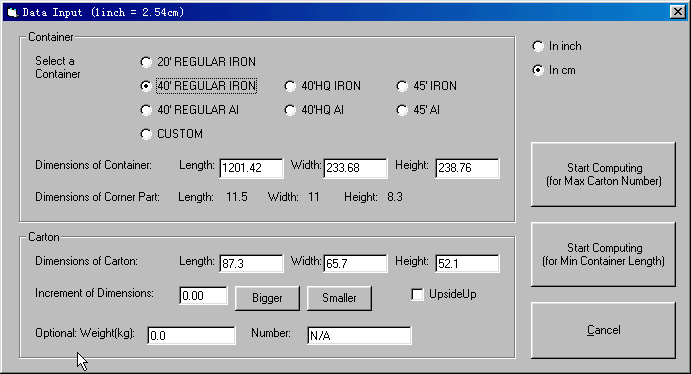
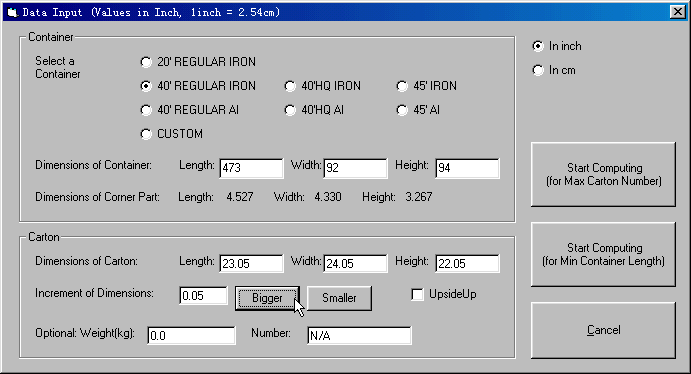
Click "Input" button to get data input frame
Fig.2 The data input interface
7 standard container dimensions as well as cumstomized container dimensions are provided. Remember, container dimensions can also be set as any 3D rectangular space to be packed by cartons. For example, after loaded a batch of cartons which occupy 2/5 container length, one need to load another batch of cartons in the remaining 3/5 space as many as possible, then, input 3/5 container length in the Length field because it is the 3/5 length space in question (see 3.6 for example). (The demo version only deal with 40' regular iron container).
The dimensions of corner parts are also shown. Corner parts are reinforcement structures at the 2 upper front corners of container. Since they are comparatively small, they do not affect the carton packing arrangement in most cases (see 3.4 for more information).
The "Bigger" and "Smaller" buttons accompanying the carton dimensions are for adjustment, which is usually used to accommodate the distortion effect of cartons. (see 3.5 for more). If the carton only can be placed upside up, check the UpsideUp checkbox. The weight field is optional, if inputed, total weight can be calculated to check if it is beyond the weight limit of the container. Number field is used for minimum container length computation, which is for multi-batch-carton packing problem, for example, how many carton B can be loaded after 100 carton A, one can first compute the minimum container length 100 carton A need, then compute carton B with the remaining container length.
Dimension values can be converted by the in/cm switch in the upper-right corner.
After dimensions and parameters are set, choose the according compute option to compute.
3.2 How to Start and terminate computing
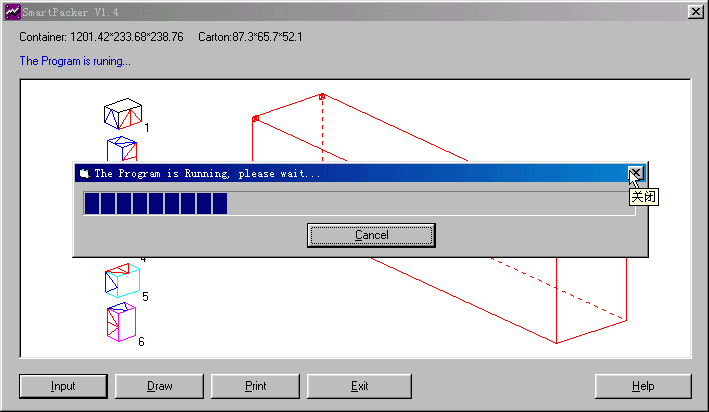
When computing start, the application pop up a progress bar showing the computing progress.
Fig.3 The program is running
As a rule, the bigger the carton, the quicker the computation will complete, and the minimum container length computation is more time consuming than maximum carton number computation. As a reference, for a maximum carton number computation task dealing with 40' regular container and 20-inch cartons, the time cost is about 80 seconds on a PIII450 personal computer. A click on the "Cancel" button can end the computation.
When the computation end, arrangement will be illustrated.
3.3.1 The orientations of carton
Generally, a carton has 6 orientation choices to placed orthogonally in container, as shown in the left part of the canvas. If there is an upside up limit, 2 choices exist (No.1 and No.3 orientation is upside up).
The carton surface with a red triangle is the front surface, and that with a blue triangle is the side surface. The red triangle's midline is also drawn out to make it different from the blue one even when the illustration is outputted to a hard copy by a black-white printer. The top surface is not marked.
For example, for orientation No.6, the carton is side surface up and top surface facing right (or to the rear of the container).
Fig.4 6 orientation choices shown in the left
3.3.2 Showing the whole arrangement block by block
Because there are usually hundreds of cartons needed in an arrangement, it is opted not to show the cartons one-by-one, but block-by-block. "block" means a group of cartons with the same orientation and form a 3D rectangular solid.
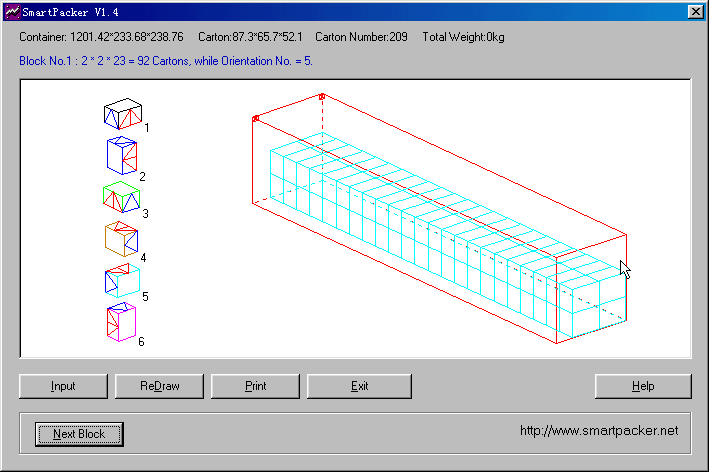
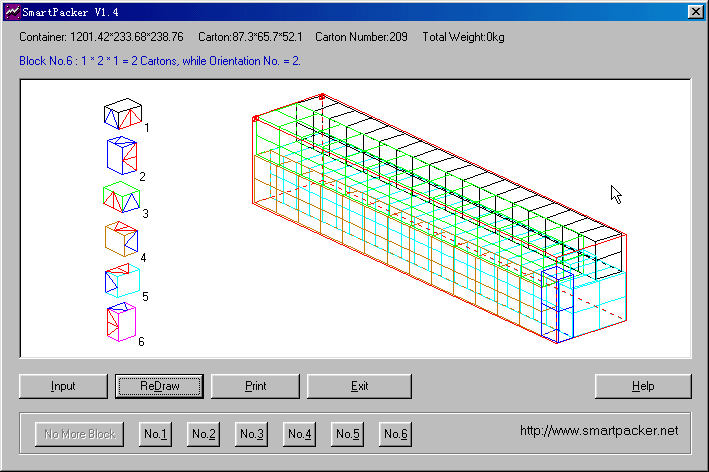
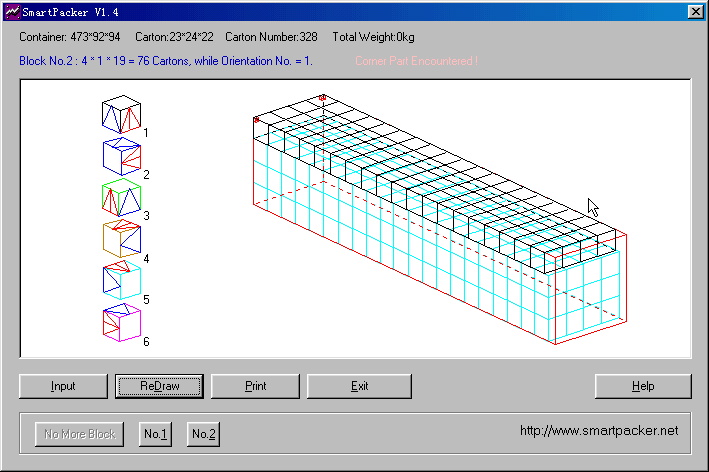
Once computation end, SmartPacker illustrate the 1st block automatically (see Fig.4). Two lines of messages are also shown in the upper portion of the window. The 1st line is about the whole arrangement (in black color), in Fig.4 it reads:
Container: 1201.42 * 233.68 * 238.76 Carton: 87.3 * 65.7 * 52.1 Carton Number: 209 Total Weight: 0kg
Which means, given the container size (1201.42cm long, 233.68 cm wide, and 238.76 cm tall) and the carton size (87.3 cm long, 65.7 cm wide, and 52.1 cm tall), the maximum number of cartons can be packed is 209. For the carton weight input is optional (see 3.1) and the default value is 0kg, the total weight of the cartons here is 0kg too.
The 2nd line is about the current block (in blue color), in Fig.4 it reads:
Block No.1: 2 * 2 * 23 = 92 Cartons, While Orientation number = 5
which means, for the 1st block, there are 2 (the first number in the multiplication ) breathwise layers, 2 (the second number) altitudinal layers, and 23 (the third number) lengthways layers, while totally 2*2*23=92 cartons in the block. Cartons in this block hold the No. 5 orientation, which meaning can be seen from the 5th carton in the left, that is, front surface up and top surface to the rear of the container. Comparing the block with the red container frame, the user can see the location of the block in container.
After the 1st block is automatically shown, user can click the "Next Block" button to continue. The order by which the blocks are shown is from front of the container to the rear, from bottom to top, and from right to left.
Fig.5 The 2nd block is added in the blue print
In Fig.5, the second line of message in the top of the window (in blue color) is now showing the parameters of the No. 2 block, and a red warning message "Corner Part Encountered!" is flashing at the end (see 3.4 for how to handle the problem).
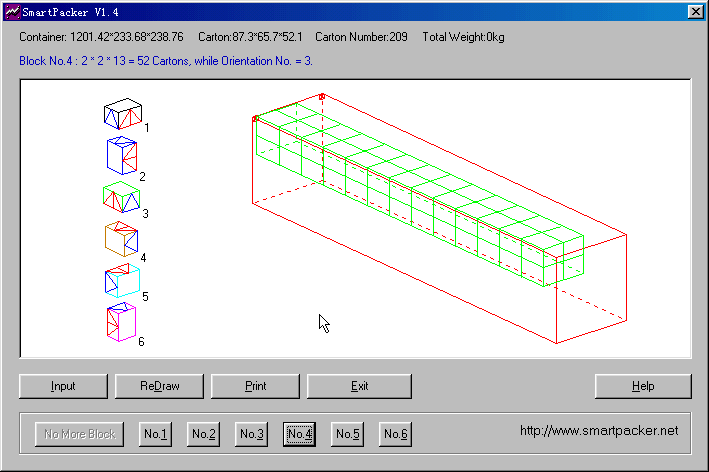
While more blocks are added to the canvas, the overlapped lines may seem confusing. Correspondingly, after all blocks have been shown, SmartPacker provide buttons for each block to be illustrated alone.
Fig.6 All blocks illustrated and seperatedly show buttons provided
Click "No.4" button in Fig.6, then the 4th block will be illustrated alone.
Fig.7 The 4th block has been shown separately
Now a click on "Redraw" button can start a new turn of show the blocks accumulatively.
User can also click the "Print" button in the above process to get hard copies, which can then be released to loaders for carrying out.
By this time, user can click "Exit" to end the application, or click "Input" to make another computation.
3.3.3 To finalize the actual packing plan
Whether the arrangement provided by SmartPacker should be regarded as a final one depends on several factors:
(1) Corner parts may affect the feasibility of the arrangement. If warned by the flashing message "Corner Part Encountered!", refer to 3.4.
(2) Cartons may be distorted, refer to 3.5 on how to account for this.
(3) As described in 1.1, there is a chance that better arrangements exist. If you can figure out a better one, stabler or of bigger carton number, adopt the better one.
3.4 The Effect of Corner Parts
As the 2 small red frames at the 2 upper front corners of the container frame shown, 2 corner parts exist, with dimension of 4.527 inches × 4.330 inches × 3.267 inches.
SmartPacker V1.4 still can not account for the existence of corner parts in the arrangement seeking process, but give rise to a flashing warning message when confliction happen.
Therefore, if no "Corner Part Encountered!" message appears, user need not care the corner parts' existence; if it appears, user need try cartons transposing or shifting to handle it.
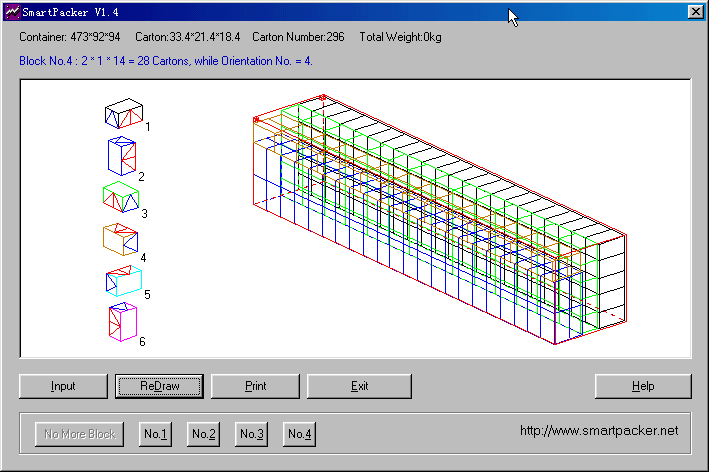
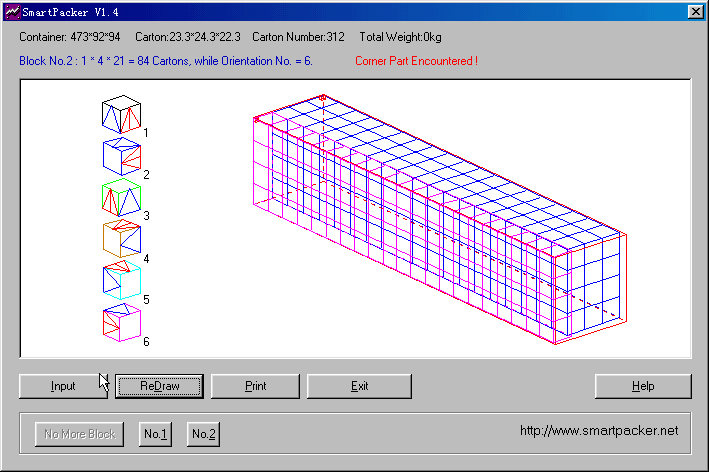
For transposing example, compute 473×92×94 container packing with 33.4×21.4×18.4 carton, the arrangement suggested by the software is as Fig.8 shown (if feel difficult to understand Fig.8, compute the problem to get illustration of each block).
Fig.8 Transposition is needed
One can see there are 4 layers of cartons posed breadthwise in the container, while the block in the right(in black color) is commented with the warning message. Anyway, the top surfaces of the 2 layers in the left are lower, and by transpose the second left layer with the right layer, the corner part confliction can be avoided, and the 296 carton number will not be compromised.
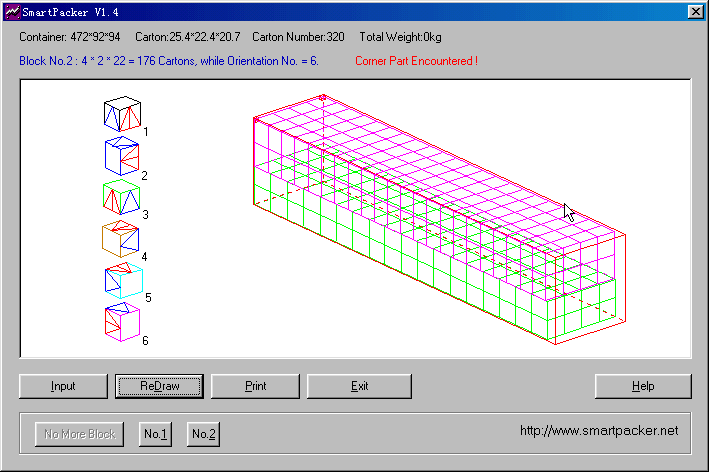
For shifting example, compute 472×91×94 container packing with 25.4×22.4×20.7 carton which ends with an arrangement as Fig.9 shows.
Fig.9 Shifting is needed
Because the upper block computed is against the container's front wall, corner parts confliction happens. Apparently, plenty space is left behind the block in container, so the problem can be solved by shifting the block rearward a little.
If the user can not figure out a measure to solve the confliction, get rid of the cartons in confliction and subtract their number from the total carton number.
3.5 Leaving margin in an arrangement
Real cartons are often in disunity of dimensions, tympanites, and shape deformation. To account for these factors, leave some margin in computation, or say, to overvalue the carton size or to undervalue the container size, can make the computed arrangement possible or easier to carry out.
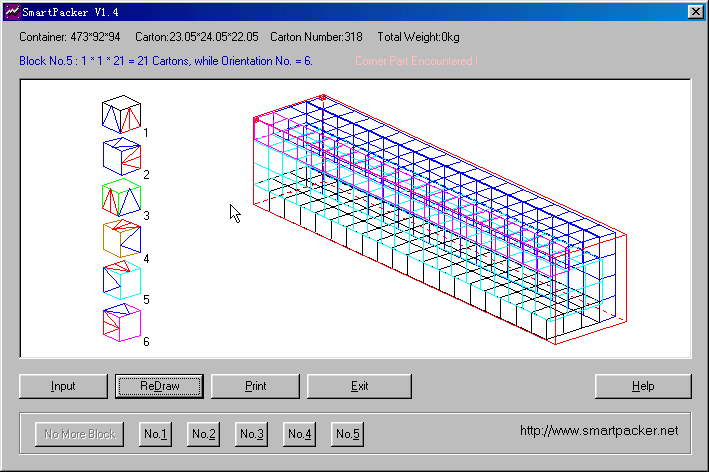
For instance, when packing 23×24×22 cartons in a 473×92×94 container, the computed arrangement is as in Fig.10.
Fig.10 No margin left, can not be implemented with carton tympanites
To input a bigger carton size, one can revise the values of length, width, and height of the carton, or just click the "Bigger" or "Smaller" button to adjust the increments.
Fig.11 Click "Bigger" to input bigger carton size
Then, for bigger carton size of 24.05×23.05×22.05, computed arrangement is as Fig.12 shows.
Fig.12 New arrangement for bigger carton size
Now the arrangement has changed, and total carton number has dropped from 323 in Fig.10 to 318 in Fig.12.
If an 0.05 inch increment is not enough to account for the tympanites effect, increase the increments to, such as 0.3 inch, and compute to get an arrangement as in Fig.13.
Fig.13 Arrangement for 0.3 inch increment
Notice, the increments on length, width, and height are not necessarily to be same, but according to the real carton's condition. How much the increment should be is up to the user's experience and judgement.
Another way to leave margin is to undervalue the container size by a similar way.
Remember, leaving margin often leads to less carton number in the computed arrangement, and it is not a must in most cases.
3.6 Packing cartons of different types
In practice, a container is often loaded with more than one type of cartons. SmartPacker V1.4 introduces the minimum container length computing function to get the optimized arrangements for each type, which can then be combined to get the amalgamative arrangement.
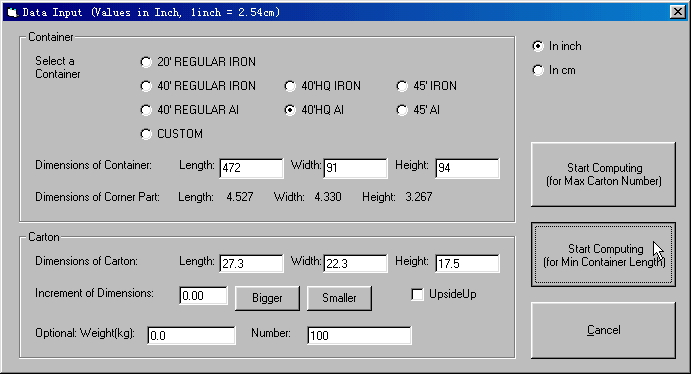
For instance, in a 472×91×94 container, there are 100 27.3×22.3×17.5 cartons (type 1) needed to be loaded first, and as many 28.2×21.8×17.1 cartons (type 2) as possible be loaded in the remaining space.
Then the first step is to compute the minimum container length need for the 100 type 1 cartons.
Fig.14 Compute the minimum container length for 1st type
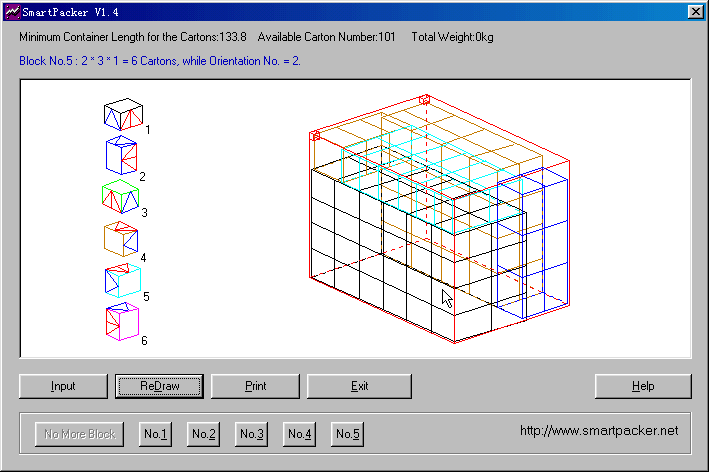
The minimum container length turn out to be 133.8, which factually capable of containing 101 type 1 cartons as Fig.15 shows.
Fig.15 Arrangement for the 1st type in the front subspace
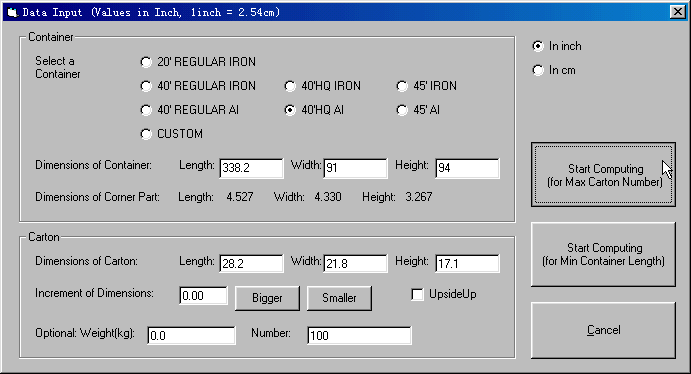
The second step is to compute how to pack type 2 cartons in the remaining subspace. Substract the 133.8 length used by type 1 cartons, the remaining container length is
472 - 133.8 = 338.2
so set the container space to 338.2×91×94, and compute maximum carton number of the type 2 carton.
Fig.16 Compute maximum type 2 carton number in the remaining space
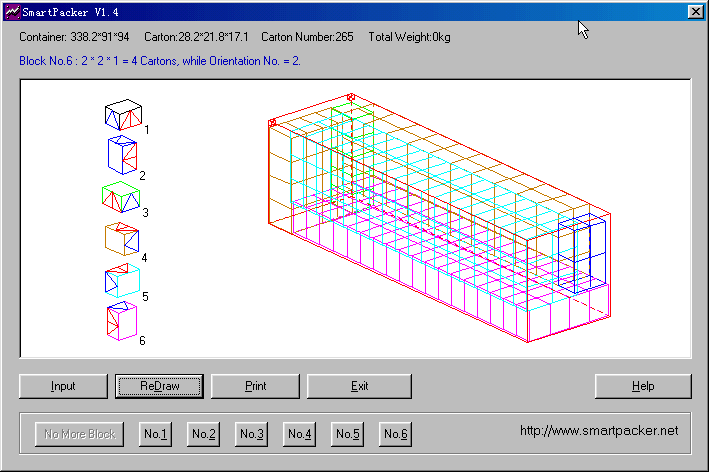
The computed arrangement of type 2 carton is shown in Fig.17. Notice: Unless the frontest one, container subspaces have no corner parts, accordingly you are greeted with the "Corner Part Encountered!" message, you can ignore it.
Fig.17 Arrangement for type 2 cartons in the remaining subspace
Amalgamatively, after load 100 type 1 cartons as Fig.15 shows in the front subspace of the container, user can load 265 type 2 cartons in the remaining subspace as Fig.17 shows.
This approach can be also used for 3 or more types of carton packing problem.

Copyright: Beijing ZhiHuo IT Ltd. 1998-2003